Saturday, April 7, 2012

Filling A Gap with Foam

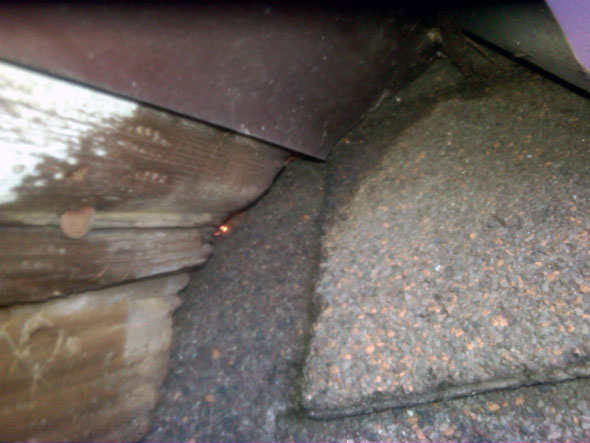
As promised last time, today I worked on plugging up that rodent hole at the back of the dormer. First off, here's a better picture of the gap:


There's a lot more copper mesh in there than it appears. It's there to capture the foam filler, to impede its progress so that once the mesh fills up, the foam backs up and fills the front of the gap solidly rather than simply continuing to move inward. Copper mesh is available from gardener suppliers, but in a pinch a copper pot scrubber would serve perfectly well.

As I mentioned, I obtained foam filler that is intended specifically for filling exterior building cavities such as this one. This is not the type of foam one generally sees at Home Depot, intended for filling gaps around windows and doors (although it serves for this purpose as well); it's denser, thoroughly weatherproof, and expands instantly. I purchased it from Gempler's, which is my supplier of first resort for a majority of my Farm House maintenance needs. 

I must admit, I was pretty daunted by this new, super-duper foam, because it comes in a huge can and is applied with a pretty impressive-looking gun.


This rig fairly shouts PROFESSIONALS ONLY, and as silly as it sounds, I wondered whether I had the chops to wield it effectively.

As it turned out, it's much easier to use, because the volume of foam is minutely controllable using the adjustment knob at the back of the gun, and the speed of its exit is easily modulated using the trigger. Thus, after some practice shots in the garage and some adjustments, I was able to place the foam right where I wanted it as easily as putting toothpaste on a brush.


After a half-hour of curing, I was able to cut the foam back to its intended boundaries with a utility knife.


It's not terribly pretty from this close up, but from the ground it blends in undetectably. Now, the gap is filled more or less permanently, impervious to critters and the weather.

One last point about this foam rig: if you leave the can on the gun, clean off the tip and close the adjustment valve completely, the foam will stay fresh indefinitely, so that you can keep using the can until it is empty. The Home Depot types that dispense directly from the can are good for one use only, no matter how little foam is actually used, because the foam cures in the applicator tube and blocks the exit of the remaining foam.

That's huge, because not only does that make this system more economical despite the cost of the gun, but it means that as I find any gaps as I work from now on, no matter how small, I can quickly and easily fill them with little added cost or fuss. I wish I'd had this rig from the start of the work.

And with that, it's time to start masking so that I can paint.

* * *

"I remain thoroughly disgusted by the rank 
anti-rodent bigotry of this establishment."
"No rodents, no peace!"

Friday, April 6, 2012

Fun with Dormers

Since last I wrote, I've been busy repairing, sanding and patching the dormer. It's taken a long time because of the vagaries of weather, and the sheer difficulty of reaching the back and top of the dormer. To sand the very top, I found it easier to climb up on top of the dormer and reach down.

The view from the crow's nest.

Complicating matters further is the fact that the level of the new roof is over an inch lower than that of the previous roof. The old roof consisted of wood shingles sandwiched between layers of sheet roofing on top and substantial redwood slats underneath. The new roof is one layer of plywood sheathing with three-tab dimensional asphalt shingles on top. The receding roofline left in its wake lots of wounds and irregularities where the formerly submerged dormer cladding was uncovered, and an awkward gap underneath where the cladding ends and the underlying structure is exposed. I'm still not sure how that gap will look when the dormer is painted; in fact, I'm not sure just how much detail will be visible from the ground, so I'm uncertain just how detailed I need to be in my patching. I may have to do another round of patching after I prime.

Here's what the dormer looks like right now:


The push broom is there to provide a handhold when working on the furthest extent of the sides (the broom head is securely attached to the handle and well-braced).

You can see that the sides are pretty messy, but I'm hoping that a good coat of paint will take care of that.

One more detail remains before I can mask everything off and start to paint. There's a gap at the back of the right side between the eave trim and the roof that opens up to the inside. This is just the kind of thing rodents use to get into attics, and it needs to be plugged up. We did have some hardware cloth covering the gap, but I'd like to replace it with something more permanent, and more presentable.

Here's a picture of the gap:


It's larger than it appears here, but in any event, you can see a bit of shiny copper material peeking out from inside the gap. This is copper mesh. Gardeners use it around planters to keep snails out; pest control people wad it up and stick it in gaps like this to serve as a backing for insulating foam filler. You will recall that I used a foam filler to fill a gap underneath the new window in the south side; the foam I will be using here is similar, but is specifically designed for this kind of situation. It's completely weatherproof, paintable, and impervious to rodents.

It's also a big mess, so stay tuned. This should be fun.

* * *

"I don't see why you don't just let the rodents come in, you spoilsport."

Saturday, March 17, 2012

Well, How 'Bout That

In the last post, I said I'd replace the broken shingle on the west middle dormer if I could find my spare shingles. I didn't want to waste a lot of time that could be better spent actually working on the house.

Well, I soon thought better about it, and realized that even though it's up high, it is the front of the house, and it really needs to be done. So I resolved to dig through the garage until I found the stupid shingles. As I suspected, they were buried in the farthest extent of the garage, with the spare restoration glass and the complete window that used to be where the kitchen pass-through is now. It only took half a day to disinter them, and I'm nearly through putting everything back; it should only take another hour or so.

At first I considered just splicing in the missing part, as I did with the apron on the east window casing on the south side, because I was afraid of splitting the shingle above the damaged one if I replaced the shingle entirely. After thinking the situation out, I realized that even if I did, the job would still go much faster and would also look better when it was done. So with an X-Acto knife I freed up the head of the nail going through both shingles, and then I coaxed it out as gently as I could.


Yep, I cracked the upper shingle; the nail was simply too firmly attached to the wood from oxidation. After all, they had been together for 117 years or so. And speaking of that, I must tell you I can't help but get a bit solemn it such situations, because I realize that I'm looking upon something that hasn't been seen by human eyes for well over a century. Just slightly batty? Sure, but that's what it took to have bought the Farm House in the first place.


Oh, and take a look at the nail I removed. Note its rectangular cross-section. This is a cut nail, so called because it was cut from a strip of steel (which is why it only tapers along the wide dimension). They weren't originally blunt like this; the tip has rusted off. It's hard to tell in this picture because of the debris sticking to the nail, but the head was formed, basically, by squashing the end of the strip together during its manufacturing. Cut nails, although still available today, were in common use roughly from the early 19th century to soon after the Farm House's founding, so when I find them I can be reasonably certain that I'm working with the original construction.

While we're on this sleuthing tack, take a look at what became clearly visible when I began to sand the wood exposed by the removing of the broken shingle! Yes, it's a pencil mark, parallel with the roof line, clearly drawn by the carpenter who laid out the shingles. Awesome. 

In order to measure the new shingle for cutting, I made a paper pattern. I have a big roll of thick kraft paper I got from Uline along with an inexpensive dispenser; it has proven its handiness on at least a weekly basis since I got it, and I highly recommend it if you have the room. Anyway, first I made a kraft-paper replica of an uncut shingle:


Then, I cut it down to the length necessary to accommodate the pattern, slid it in place behind the upper shingle, slid a bone folder (a popsicle stick will do nicely) along the diagonal where the shingle meets the eave, then took it out, folded it along that crease, put it back in to check fit, then adjusted it until it fit well:


The black tape is there to keep the split shingle together until I can fix it.

The rest of the job was blessedly simple: cut the shingle and slip it into place.


Perfect! It hardly needs nailing, but of course I'll do that.

Note something interesting about the shingle pattern in this gable: the size of the shingles, and the pitch of the dormer roof, cause each course to be a whole number of shingles, increasing by one shingle for each course. Perhaps this is a coincidence, but it suggests a purposeful relation between the shingle size and the roof pitch; otherwise, one would expect that partial shingles would be necessary to complete the pattern in places. I know that the foreman on the construction project mentioned that there was a complicated calculation necessary to plot the proper placement of the shingles. I'll have to look into this further.

Climbing back into the house after this triumph, I happened to look up into the eave. Here is what I saw:


Funny I'd never noticed that particular pattern in the wood before; I guess usually when I'm out there I'm either looking down at the veranda roof or up at the house roof. In any event, this was a significant discovery, for it was evidence that, as I have long suspected, the front gables originally had bargeboards.

Now, I understand that these architectural terms I tend to throw around can be confusing, so here is what a bargeboard is:


It's the large, gracefully-curved green trim piece running along the gable in this picture. The pattern I saw in the eave of the dormer gable was exactly like the pattern I saw in the south gable before the missing bargeboard was replaced, but it was inconclusive, so I looked for the conclusive evidence. I found it higher up:


This shows the unmistakable pattern of a mounting block for the bargeboard. I can't believe I didn't notice this before, because as I said I suspected there were bargeboards in the front dormer gables, but better late than never.

This is quite a thrilling discovery, because the restoration of these bargeboards is going to make the Farm House even more beautiful than it is now. I'm not going to do anything about it until I'm completely finished with the exterior painting, but I'm going to take complete pictorial and video documentation of the evidence now, and I'm not going to sand out any of these marks, because when the time comes I'll have to bring this matter to the Cultural Heritage Commission for approval.

* * *

"I bring you this offering of fresh-killed prey in token of my appreciation for your fealty."

Tuesday, March 13, 2012

Triage

Whenever I begin a new segment of this project, my first impulse is to plunge right in and start whacking away at it. By now, fortunately, I've finally learned that before I do anything else, I must brush off all the loose dirt and debris and examine the areas to be painted closely, looking for anything beyond the usual sanding and patching that needs to be done before I paint. For the most part, this involves looking for any loose or damaged pieces that need mending.


There is surprisingly little of this nature on the middle west dormer. There are in fact just two items, only one of which affects building health: a split piece of siding.


This split is complete, and the bottom half is somewhat loose. This allows the elements unauthorized entry, and must be repaired. I'll secure the loose piece, and fill the gap with epoxy putty.

The other item is merely cosmetic: part of a fish-scale shingle is missing.


This doesn't compromise building integrity, so it is not essential that I repair it. I will if I manage to dig up my spare fish-scale shingles from the deepest recesses of the garage, but I'm not going to waste a huge amount of time looking. Time's a-wastin'.

* * *

"Hey, Warden! How's 'bout springin' us?"

Monday, March 12, 2012

My Next Nightmare


The center west dormer is next to be painted. While it needs a few repairs on the sides, and there will be some tight spots to get to where the dormer meets the roof, this should go fairly quickly, because it is small and I can reach everything readily except for the eaves in the very back. I'll fix that broken shingle if I can find my spare shingles, which is a big if.

The most complicated aspect of this job is that I will have to remove the sashes. There is simply no other way to paint the window jambs, or in fact the sashes themselves. It's a small opening, so I should be able to get away with taping some black plastic to the inside of the opening for a few days.

This will be an all-brush job, as will be all the dormers. There's simply too much risk of overspray getting on the shingles to use the sprayer. I have just obtained some new, stiffer brushes that I hope will yield a more satisfactory result than I achieved on the brushed parts of the south side using the kind of thick, instantly-curing paints that we are forced to use hereabouts nowadays by an overweening bureaucratic entity with no connection to the electorate.

A Long Nightmare Is Over

The south side is done.


I will do the foundation at the end of the painting work all at the same time, because it will involve some civil engineering beforehand.

Saturday, February 18, 2012

What I Did on My Winter Vacation

Usually, I take some time off from the restoration project around Christmas to give the Yuletide celebration my full attention. This year, however, my hiatus was a great deal longer for several reasons, mostly beyond my control. First of these was the wind storm and its aftermath, of course, as I have already discussed; there was a lot of debris removal and regrading I had to do just to make the south side of the house accessible again. Frustratingly, I was within a week of finishing that side when the storm hit. Now, I have some new repairs to make, and I'll have to pressure-wash the side before I paint.

Soon thereafter, I came down with a bad case of whatever bug was making the rounds at the time, and that took me out of commission for most of the rest of the month.

Then, just before Christmas our new Malamute pups arrived, Peter and Sally. I anticipated that attending to them would take up all my time for a few weeks, judging from our fairly recent experience rearing Travis from puppyhood. He was no piece of cake to take care of, so I figured I had a pretty good idea of what to expect.

As it turned out, we were woefully under-prepared for Peter and Sally, and it took us until the end of January to figure things out and get on top of the situation. Much of the problem stemmed from trying to follow the dictates of the "experts", which flat out didn't work. So to be precise, I guess I'd have to say we were studiously mis-prepared. It was only when we threw out all the books and returned to the techniques that worked with Travis that our sweet, spirited little pups began to follow the paths of righteousness. Still, with them it's often a case of two steps forward, three steps back. Then again, there's very little in life that is both worthwhile and easy.

Without further preamble, here's what we've been up to lately, in too much detail.


Windstorm Aftermath

I've already covered this subject fairly thoroughly, but there is one matter that remained undone when I last discussed it: the broken limb hanging over our power drop. As I mentioned in "Paul Bunyan Jr.", our arborist was not comfortable with the task at the time because of its inherent danger, and recommended we tell Pasadena Water & Power about it, because they could get it done more safely. Unfortunately, PWP was simply too swamped with emergency work to get to our less pressing matter, so when our arborist drove by at the end of December and noticed the limb still hanging, he stopped in and said, "Okay, let's get that done."

One of the many things I like about our arborist is that he gets things done the old-fashioned way, with rope and tackle instead of cranes. I'm not comfortable with heavy machinery rolling around over the trees' root systems. I find the skill and fearlessness with which he and his men go about their work quite inspiring. This was especially true of their removal of the broken limb over the power drop, because of the significant added danger of the power lines directly underneath the limb. I made a point of taking pictures of the process so that I could show you all.


In this picture, the man up on the limb has already removed the broken limb (you can see where it was directly ahead of him on the limb he's standing on). The broken limb is hanging below him, suspended by a rope secured to a limb above him. He is guiding the limb away from the power line below.


In this picture, the arborist (in blue t-shirt) has looped a rope around the power line and is gently pulling it out of the way, as another man (in orange safety vest) helps guide the limb away from the power line as the man above gently lowers it. You can see how close a thing it was, but they got the limb down without incident.

I've failed to mention that there was another limb broken facing the street, about the same size as the one over the power line. Here's a picture of that limb on the ground:


You can't see it here, but the limb stretches all the way to the street. That's over 45 feet! As one of the men commented, this one limb is itself as big as a tree. I was astonished at its size, because when it was hanging from the tree it looked much smaller. After all, it was just one small part of one of many dozens of limbs on the tree. That should give you some idea of just how massive these trees are.


Christmas

We spent Christmas alone at home, we and the pets. It wasn't a quiet Christmas, thanks to the pups, but it was one to remember. My plan to put lights up along the big side gables was thwarted by the wind storm, so I just put them along the veranda as usual, but we did the tree up as grandly as we ever have.

I say "we", but I was still pretty ill, so Wifey did the tree all by herself. She came home with a tree so big that we could hardly get it in the house, but that's fine, because we have many hundreds of lights and enough ornaments for three big trees. This year, she outdid herself.


Up in Heaven, Dad was smiling. Both Dads, in fact.  It was breathtaking, with great depth, ebullient color, and rich textures. Here's a close-up, to give a better idea of what the tree looked like in person:


And of course, most of the ornaments carry with them some sort of special meaning or tender memory of loved ones and Christmases past, just as it should be. It was so beautiful that we kept it up through Wifey's Mom's birthday on the 15th. It stayed fresh, because I conditioned the tree well and kept it watered.


Pets

Now we come to the main part of the story. We were kept busy not just with the care of two seven-week-old puppies, but also with helping the rest of the Pet Division adjust to their presence.

Peter and Sally came to us several days before Christmas, and made themselves at home right away. Travis was happy to have some reinforcements, and the pups liked him immediately.


As one would expect, the cats were a harder sell. In fact, at first it seemed as if they couldn't quite figure out just what manner of creatures they were dealing with.


Here, Adam looks as if he could really use a Tricorder: "What is this strange creature? Hmmm. . . it's put together like Travis. it kinda smells like Travis. It makes similar noises. But it's so dang small!"

Actually, Adam quickly made his peace with the pups. Given his Brobdingnagian size and feline curiosity, he's afraid of very little. I often find him walking right up to the pups, trying to engage them in discourse.


He and Peter are not pals yet, but I think they eventually will be.

Evangeline has no problem with them, because she loves dogs, but she does expect them to maintain a respectful demeanor befitting her status as CEO of the Pet Division; they do not always comply, but she always stands her ground. 

Benny, a cat through and through, is no big fan of dogs, but he has at least accepted their presence. Still, he does tend to take out his annoyance on Travis, batting him mercilessly whenever the pups get in his face: "Take that, you canine, you!" He is nevertheless willing to be friendly, if they approach him nicely.


The addition of two spirited puppies could not help but cause some upheaval with the other pets, and except for Evangeline they've all required a lot of special attention. But everyone's beginning to become accustomed to the new order, and at times things are positively placid.


Most of the time, however, the puppies simply tire the rest of us out.


That's why during the day I like to keep them outside. It gives the rest of the household a break, and I'm able to keep an eye on them while I work. I can't let them roam free unsupervised, because they have a disturbing habit of eating yard debris and dirt. Thus, much of the time they are in a pen we put up on the astroturf-topped pad that used to house the gazebo. It may seem a bit severe, but they are fine with it. As a matter of fact, they seem to enjoy it.


They're changing on a daily basis, as puppies of their age do, and they're both growing into quite beautiful dogs.


Farmhouse Fauna

As I've discussed over in the Journal, we have a lot of resident animals here. Actually, there used to be a lot more—huge raccoons and it seemed like a hundred possums—but Travis, as he was bred to do, chased them all away. Now, what we have are thriving bird and squirrel communities, and some skunks as well, which Travis has not been able to chase away (not that he hasn't tried, unfortunately).

A lot of people hate squirrels, but all of us here love them. All, that is, except for Benny. Benny is a dedicated squirrel hunter. Think of how Captain Kirk felt about Klingons, and you have some idea of how Benny feels about squirrels. 

One day a few weeks ago, Benny and I were sitting out on the garden swing. I ran into the house for just a second to get something, and when I came back out, I didn't see Benny anywhere. I was momentarily confused, because he hadn't had enough time to get out of sight. And then, I looked up.


Benny had actually climbed up in the persimmon tree after a squirrel! Notice that the squirrel is not overly concerned by this; as Benny stares up at him, the squirrel is staring right back, as if to say, "Surely, you can't be serious." Hey, you can't blame a cat for trying.

We have an amazing variety of birds here at the Farm House. We have the usual resident species: crows, mourning doves, band-tailed pigeons, various finches, and our dear friends the scrub jays.


The jays are the cornerstone of our avian community. They always say "good morning" to us, and they always let us know when it's time to replenish the feeder. Once, they even left Wifey a present. One morning they were squawking at the feeder. Wifey wondered what was up, because she'd just put out some food for them. She looked out and saw something odd hanging off the feeder. It turned out to be a necklace!

We also get some interesting birds passing through during migration periods, and some birds that are local but not often seen: tufted titmice, bluebirds, robins, and the most spectacular of our periodic visitors: the Acorn Woodpecker.


With all our oaks, our yard is a perfect fit for them, but they don't usually eat from feeders, and with that big target on their head they need to keep out of the open as much as possible, lest they attract the attention of our local hawk. It's thus a big day when we see one of these beauties.

It may come as a great surprise to non-Angelenos, but we have a number of large parrot flocks in various parts of the city. In Culver City, the flock consists of some sort of long-tailed parakeet: colorful, slender-bodied birds with (of course) long tails. We actually had one of them land at our feeder there; I have a picture of that somewhere.  I think it was a Mitered Parakeet.

The flock here in Pasadena, on the other hand, is of some sort of Amazon variety, with substantial bodies and stubby tails. I haven't gotten a close look at them, because they for some reason never light in our yard, but they are mostly green. They typically fly by twice a day, in the morning and late afternoon, and they make a great noise as they pass, because parrots are in constant communication with one another as they fly. Here is but one platoon of their huge regiment:


I was lucky to get this shot, because these parrots fly with astonishing swiftness. I'd estimate that they took about a second to fly the distance captured in this picture.

Well, that's about it for this time, folks.

* * *

". . . and stop calling me Shirley!"

Thursday, January 12, 2012

Adult Education; or, A Chump Smartens Up

As I promised last time, here is the newly-repaired corner board:


I had to use so much putty because, as I described last time, I did a quick repair. If I had done the by-the-book repair I described, I would not have had to use much putty at all; but then, I'd probably still be working on it.

Today, I noticed another repair that has come undone, on the east window casing:


At first, I ascribed this to the various stresses caused by the windstorm, because of the slight circular protrusion below the crack revealing where a screw hole was patched. This indicates that the board moved inward relative to the rest of the house. Given that there's no evidence of anything having hit the board, this movement almost certainly was caused by the house's reacting to earth movement—and there was plenty of that during the windstorm.

Then, however, I noticed the circular depression up at the top of the long crack. Sure, one could ascribe that to the same cause, but something about that screw, and that crack, tickled my memory. I looked back through the posts until, sure enough, in the post "Onward" I found this picture:


I included this picture in that post to illustrate how effectively the LiquidWood bonds wood together. The wood was warped outward, and where I placed the screw was the best place to bring the board back into alignment.

What we have here, clearly, is a Teachable Moment. And as with a schoolteacher back in the Old West, I'm sometimes only a lesson or two ahead of the class. The bulk of what I know about the home-improvement subjects I discuss herein I have learned from experience, and as you can see, the learning never ends. That's what makes life so fun.

What I said about LiquidWood was not wrong, per se, because the mend did withstand the screw's intrusion without complaint. Nevertheless, a mend is still a weak point in the wood's  structure; to counteract that, I would have had to impregnate the wood on both sides of the mend more thoroughly with epoxy, and further back from the mend line. As it was, the mend was already under constant stress from the wood's desire to return to its natural contour, and the added stress of the house's movement caused the mend to fail.

It is thus clear in retrospect that I should not have placed that screw right along the mend, but what should I have done then, and what should I do now to fix it?

To answer the first question: because the wood was warped and I wanted to bring it back into alignment, I should have been more thorough in impregnating the wood at the top of the board with LiquidWood, just to give it more strength and resilience. When bringing it back into alignment, I should have used smaller screws and more of them, placed more carefully back from the edges of the board.

To answer the second question: I think it's too late to depend upon epoxy saturation to keep the mend together, because there is now cured epoxy along both sides of the break. The best thing to do for the good of the house would be simply to replace the board, but that isn't going to happen. So I guess I will have to remove the offending screw, re-mend the crack, bring the piece back into alignment with smaller screws placed carefully to the right of the crack, patch it up, and see what happens. The worst that can happen is that I learn some more stuff.

Friday, January 6, 2012

I Triple Dog Dare Ya!

And I have the wherewithal to do it!


Yes, December was an eventful month here at the Farm House. First there was the epic wind storm, of course. Then came the cleanup, which is ongoing. Then, I fell ill with whatever flu is in this season, a pretty virulent one that lasted pretty much the rest of the month. The puppies came on the shortest day of the year, and somehow we managed to fit Christmas in among the other things. What with all these matters, I was not able to get back to the painting prep until this week.

The last thing I did, as you will recall, was to epoxy the crack at the bottom of the front cornerboard. Unfortunately, that mend did not hold.


The Farm House nearly always manages to punish me when I am in too much of a hurry. I did not properly prepare this crack before I mended it. Instead of drilling some ancillary holes to make sure the wood on both sides was saturated with epoxy, I just injected some into the crack and clamped it. Obviously, there was not enough epoxy to generate the hold needed to counteract the wood's desire to spread apart at the crack.

The proper way to mend it at this point would be to fabricate a backing piece that would run the length of the crack and most of the width of the board, sand the oxidation and dirt off the back of the board in this area, epoxy the backing piece to the board, clamp the crack closed, then drive screws through the board into the backing in several places along the crack to clamp those pieces together front-to-back.

Nevertheless, this is not what I did. It would take far too much time for too little benefit. Instead, I dug up a strip of wood from my scrap pile that just filled the gap between the corner board and the siding.


I was pushing the boards together here to check the fit.

I trimmed the strip so that it ends just shy of the corner board, and then screwed everything down on both sides of the crack.


The corner board was twisted outward here on the right side, so while this repair makes the corner board stable and square, the wood to the right of the crack is a bit lower than that to the left. For this reason, I had to do a lot of puttying to finish the repair. I'll show you the results next time.

* * *

"There goes the neighborhood."