Thursday, October 27, 2011

East Casing Ready to Paint

After nearly three months and over a quart of putty, I've finally finished the reconstruction of the east casing.


Please forgive the odd angle; the pine tree is in the way, so the only way I can get a picture of this casing straight on is by sitting on the ground with my back pressed against the trunk. In fact, the close proximity of that tree is a large part of why this casing has taken so long, because it's made it very difficult for me to get a good angle on my work in the upper left area of the casing.

I was planning to show some before/after pairs of photos in order to illustrate the extent of the work done, but to tell you the truth, the comparison does not show any real improvement except for at the sill, because before it was least painted, and now the extensive patching makes it look worse in many places. I'll thus skip the comparisons for now.


There are still some shallow voids in the major patching areas, the sill and cap pieces, but I've gone about as fur as I can go with WoodEpox. Any patching material is limited by its granularity, i.e. the size of the particles of which its solids are composed; eventually, the defects become too small for the putty to fill. I'll attend to them as part of the painting work.

I'd like to discuss one detail of the patching before I move on. Because I patched the left cap piece in place, at its left end I had to patch it flush with its adjoining pieces.


Were I to leave it like this, once I painted the casing this area would look unnatural because of the lack of seams among these three pieces, especially because the seam between the apron and the backing piece opens up at the bottom end where the triple-bead figure carries through. An X-Acto knife and a ruler will take care of this:


There. Now it looks as if the three pieces are butted up against each other perfectly. Now, in general details of this size are not visible from ground level, and these tiny lines are no exception. Nevertheless, the shadows they cast will be visible, and if they were missing the eye would tell the viewer that something was wrong, even if he couldn't figure out exactly what it was. This is a small detail, but it only takes a minute or so to add, so why not?

I'm now going to give the casing a coat of primer to protect it, but I will then go on to the rest of the trim patching. There's no sense in putting the finish coat on and then covering it with sanding dust from the belt course directly above. 

* * *

These are the voyages of the starship Enterprise. . .

Tuesday, October 25, 2011

TV Time!

One of my favorite corners of the World Wide Web is the Internet Archive. If you've never been there, it's a massive repository of all sorts of public-domain media. One can even view old iterations of Web sites via their Wayback Machine, should you be nostalgic for the comfortably clunky look that even the biggest sites had back in the last millennium.

Our main interest in the IA, at least thus far, is in their "Moving Images" archive, wherein repose thousands of films and episodes of TV shows that have fallen into the public domain. Many, many good Netizens have taken the trouble to transfer these shows into digital form and post them for us all to enjoy, and Wifey and I are quite grateful for this. We have a strong yen for the old and the obscure, especially if it involves familiar actors, and we have found some real gems at the IA.

One can stream all IA content directly from the site, but we prefer to download things and watch them on our TV. Thus, when I am otherwise idle, I am often rummaging through the IA listings, downloading promising items to watch later. We view them using a Boxee box, which is essentially a little specialized computer that aggregates audio-visual content from the Web and from your own local network files and presents it all (well, mostly all) in a neat, menu-based format, accessible from your TV or networked computer.

Tonight, we watched a real gem, as obscure as they come. It was the premiere episode of Diagnosis: Unknown, entitled "The Case of The Radiant Wine." We enjoyed it so much that I resolved to present it here for your enjoyment.

This show was a summer replacement show (remember those? then you're older than me, Dearie!) for The Garry Moore Show (remember Garry Moore? then you're older than me, Dearie!). Summer replacement shows usually ran thirteen weeks, but this show was interrupted twice, two weeks each time, for the Presidential conventions (remember when the networks covered those like a blanket? okay, the bit's played out). That's a shame, because based upon this episode, if the show had run the full time, it might well have been picked up for a full season.

Diagnosis: Unknown starred Patrick O'Neal as a research physician with a strong sideline in homicide investigation, and co-starred Chester Morris as his contact on the police force. This episode guest-stars Tom Bosley, Larry Hagman, Murray Matheson and Patricia Barry. The first two you know, the third you will recognize, and the fourth--well, if you are a fan of Columbo, she was the gallery owner in the episode starring Peter Werner, "Playback". Oh, and keep an eye out for what I think is a brief cameo by Garry Moore himself, in the delicatessen scene.

The quality of the video is pretty good, actually excellent by IA standards, given that it obviously didn't look great in the first place; it appears to have been shot like a soap opera, live with just general lighting. It may have been televised live, then re-broadcast on video for the West Coast, although this print looks as if it were shot directly on film. Quien sabe?

Enough of the technical stuff. Watch, and enjoy a slice of TV the way we watched it back in the day. I mean, the way they watched it.

UPDATE: I watched it again, and confirmed that it is definitely Garry Moore. He's at the end of the delicatessen scene, the man standing talking to someone in a booth that Bosley touches on the shoulder as he walks by.

Also, I forgot to note that the much more recent show Diagnosis: Murder, starring Dick Van Dyke, bears more than a passing resemblance to this show.


Saturday, October 22, 2011

Regaining Focus

The next day, I took stock of the progress on the rebuilding of the east casing sash. 


Uh, did I say "progress"? Man, did I make a mess of things! I guess I was just in too much of a hurry. I had tried to use the forms before I had built the sash up enough to provide the proper support for them. I realized that I couldn't determine how to fix this until I had smoothed things out a bit. I filled in the remaining large voids in the top. sanded out the wood remnants and the rough spots, and took some measurements and levels.

As it turned out, the situation actually wasn't bad; the only problem was that I had built the top front edge out too far in places, which was throwing off all the other angles. So I rehabilitated my wood forms by flipping them over and scraping off the remaining epoxy, made sure they had a good coating of mold release agent, and carefully re-clamped them, matching the dimensions of the completed west sash. Once I had sanded off all the putty that projected beyond the forms, it became quite evident where I needed to apply more putty.

Right at that point, I was just about out of putty. Truth be told, my mind has not been on my work these past several weeks; I've pretty much just been putting one foot in front of the other and slogging through, so to speak. I've been mechanically scooping equal amounts of Part A and Part B from their tubs without taking note of how much was left. Honestly, it never occurred to me that I would go through an entire quart of putty on this one casing and still not be done, but that's what happened. 

I did have one other issue to deal with during that time: my new contact lenses. After the initial thrill, my eyes and my brain rebelled against the drastic change. These new lenses are huge in diameter, with an abrupt change in profile at the junction between the two corrections; the resulting irritation caused the lenses to cloud up frequently. The odd configuration of the corrections, with close vision coming from the middle of one lens and the mid-range coming from the periphery of the other, baffled my brain for several weeks, and there were many times when neither region was in focus. Thus, for a few weeks my working vision was actually worse than before. 

I finally had to start consciously prompting myself where to get focus from for a particular situation, actively training my brain to work with these lenses. Just this week, my brain finally caught on, and now everything in my field of vision is in seamless focus, if still a bit cloudy at times.

I had actually noted my dwindling supply of putty last Friday and had put an order in late that afternoon, but I didn't expect it to arrive until next week, because Abatron is in Wisconsin and I didn't imagine the order would go out until after the weekend. But they really came through for me; they somehow managed to ship the same day, and I got it on Thursday, just when I needed it. Yay, Abatron!

Thus reprovisioned, I puttied the front plane of the sash flush with the forms, and when I took the forms off and sanded back to profile, I found that I finally had all the lines established properly.


Now, it's a simple matter of filling in the remaining divots and leveling out the top slope. After what has seemed like an eternity, I'm just a few days away from being ready to prime this casing. That is, I am as long as the patching of the cap piece does not present any unforeseen difficulties.

* * *

Space: the final frontier.

Thursday, October 13, 2011

I Haven't Got Time for The Pain

If you all learn only one thing from my efforts herein, then let it be this: don't rush. Or, as my wise supervisor used to tell me constantly when I worked at a Japanese bank, no lush! Honest, she really did, and she was definitely on to something. Now, I never got hurt rushing around dear old Dai-Ichi Kangyo Bank, but I was young and ept then, and could see what I was doing. Now that I am older and increasingly eptness-challenged, and my new contacts are giving me hell, I constantly find myself outrunning my headlights, and damaging myself thereby.

The latest instance of this occurred last night, when I was rushing to do my chores and ended up (Lord, this sounds stupid) gashing my finger on a tape dispenser. Now, in my defense, it is a huge dispenser, for packing tape, and the cutting blade is savagely serrated. Nevertheless, it only happened because I was in a hurry. The irony of it is that the injury occurred when my finger got stuck between the blade and its safety guard; if it hadn't been for the guard, I would have gotten off with a light scratch, if anything.

In any event, I've had to put myself on the DL, at least for today, just to give the finger some time to stop throbbing and me some time to find my danged finger guard. So that means I can bring you all completely up-to-the-minute on the thrilling restoration of the east casing!

After installing the rehabilitated right cap piece, the next step was naturally to patch the left cap piece. Actually, I began to patch it before installing the right piece, because there was a big gap on its underside that I wanted to patch in order to immobilize it while avoiding the driving of more nails, and I wouldn't be able to do that with the right piece in. In the process, I immobilized it in the wrong position, out of vertical alignment with the right piece. 


The misalignment is most evident where the arrow points. Actually, I rather lucked out here, because the upper side of this piece at this point is so worn by time and the weather that had it lined up properly on the bottom, I would have had to raise the upper plane of the piece along much of its length by this much to make it match up. That would have involved significant amounts of time and putty. This way, the top lines up nearly perfectly, and I only have to build up the small exposed area of the bottom plane for about a quarter of its length in order to make the cap pieces line up visually. This involves considerably less work, and very little putty.

I'm trying a new method of patching when I must re-establish missing edges. As I've mentioned, this kind of work takes several passes with the putty, because the edges must be built up along the intersecting planes that define them. Up to now, I've sanded after each pass in order to see clearly where I must patch further. When I was less experienced at this task, I needed to do it this way in order to keep track of where the edges were; as I gained experience, I kept doing it this way because I thought it used less putty. 

I have however begun to suspect that I'm not really saving that much putty this way, and I am sure that repeated putty/sand cycles take a lot of time. I am thus experimenting with making successive putty passes until I've substantially completed the task of building the piece back up, and then sanding back to the desired profile. In this way, I hope to limit the sanding passes to three at the most. I expect this will save time because I won't have to wait until the putty is completely cured before doing the next pass, and because fewer sanding passes will take less time as a matter of course.

Here is where I'm at with the left cap piece using this method:


It's substantially built up, but not completely so. At this point I need to sand back to profile in order to ensure that the lines are established so as to line up properly with the right cap piece. Note that I've masked off the right piece in order to prevent altering its already-perfected profile. I'll have to sand with great care at the junction.

I've also been working on the sash, and that hasn't been going so well. This time, I planned from the start to use the guide form method I devised while patching the sash on the west casing. That time, I had both ends and the middle established, and only had to fill in the divots and establish straight edges; this time, I foolishly only established the ends, and applied the forms with no place in the middle to apply a clamp. This allowed the forms to bow outward in the middle, so I had to hold them in more or less the proper place as I did the first pass, let this pass cure fully, and then clamp in the middle for the second pass. This worked amazingly well, considering how ad hoc it was.


Nevertheless, I could not avoid the consequences of another error I had made: forgetting to coat the forms with mold release agent before putting them in place. The bottom form came off with some tugging, but I had to coax the top form off with a stiff putty knife and a rubber mallet. This didn't go too badly, because the epoxy was harder than the wood of the form, but it did leave something of a mess.


All I can say here is, no lush!

Tuesday, October 11, 2011

Onward

The blog has lagged behind the work, so in the next few entries I'll catch you all up.

We left off with my re-establishing the triple bead pattern. Besides the one major divergence I showed you last time, the work went pretty well, although I discovered that I had to do the upper third of the other side as well.

After that, I returned to the replacement of the missing piece of trim at the top of the casing. To review, this was the condition of the area in question when I began work:

 
As I've mentioned, I faced this situation with dread, because it necessarily required my fashioning a new piece out of wood to replace the missing part. I'd not had much success with freehand cutting of curves in wood, and here I was faced with a piece of complex shape that had to match up at least well enough so as not to attract the eye.

That actually went pretty well, as you know, but now I had to put the piece in the right place and patch up the seams. First, however, I had to prime the back of the piece, and sand and prime the wood that would be behind the piece.


I primed the whole apron piece after patching and sanding it, just so I could see at that point where I had to patch it further. I also primed behind where the cap piece was to go (and I primed the back of the cap piece, too). It's always a good idea to back-prime; not only does it provide extra protection, but in the case of trim pieces, it helps to avoid the cupping that can happen when more moisture gets in the back of the piece than the front. 

I was determined to take every precaution to make sure the patch piece went in exactly the right place and stayed there, so I glued it in with one-minute epoxy and then nailed it in (after pre-drilling, of course),


There's that danged mis-matched grain again! Well, at least it's in the right place. From here, it was a simple matter to patch it in with epoxy putty.


So far, so good! It looks as if I've aced this job. We can't be sure until I've primed it again, but I want to finish all the patching first.

I'd like to show you just how effective the LiquidWood is at thoroughly re-integrating fractured wood, and I think this picture should do it:


I needed to pull this piece back level with the casing, and the screw is in the perfect place to get that done. Notice that I was able to place it right on the repaired crack with no fear of opening the crack up again. LiquidWood is designed specifically for wood; it penetrates on both sides of the repair, so that when it cures it locks the two pieces together, making the piece stronger than the wood ever was on its own. The piece may in time crack again, but certainly not where it cracked before!

After this, I replaced the cap piece that I repaired earlier, resulting in the casing's looking like this:


There's still some patching to do, most notably the sill, but this is already a huge improvement. This casing is going to come out just fine.

* * *

It grieves me to report that our dear golden girl Nellie passed away last Tuesday. We got her full-grown from the pound a little over thirteen years ago, so by our reckoning she was fifteen. But she retained her great beauty and joyful spirit right up to the end. We loved her and depended upon her, and we will miss her terribly. 

I will write more about Nellie in due course over at the Journal. Until then, I offer a brief memorial in photographs.


Nellie, c. 1996 - October 4, 2011

Tuesday, October 4, 2011

Vision Quest

You may have noticed that I haven't posted in a while. This is mostly due to our having been quite busy with various animal husbandry matters, but I have also been slowed by my eyesight.

I have abysmally poor vision. It's entirely correctable with contact lenses, but as I've gotten older, getting the right correction has been increasingly difficult. At times, in fact, my vision has been something of a handicap. A new prescription will take care of things for a while, but soon I'm back in the fog again.

As it happened, I'd gotten a new prescription, from a new optometrist, just before I started the painting project. The timing was fortunate, because he moved me to soft lenses, which handle things like sanding dust much better than do rigid lenses.

By last June, however, I had descended back into the fog, this time worse than ever. I had effectively lost my depth perception, and my mid-range vision (from arm's length out to several feet) was completely out of focus. This combination resulted in my not seeing anything in my mid-range that I was not specifically looking at; my brain simply was not receiving enough information to register it.

And so I began to go through life like a pinball, bouncing off door jambs, tripping over table legs, and stepping on our ever-underfoot pets. Climbing up a ladder or working with sharp tools required my full concentration, lest I do something stupid. This quickly became quite a hindrance, because after an hour or so of this I'd be pretty much done for the day.

I tried to work through this, because I've found that sometimes my eyes get a "second wind" with a prescription, and my vision comes back again for a while. I just didn't want to take the time to drive across town for several visits to the optometrist until I had at least finished the south side.

Then, about a month ago, circumstances forced my hand. I was up on a ladder in the garage, fetching some boxes out of the rafters, when on the way back down I completely lost track of where I was and stepped off into thin air.

Miraculously, I avoided serious injury, landing in the one soft spot within range, although both my hands got messed up when I landed and heavy things fell on them. I was incredibly fortunate to get off that lightly. Someone up there must have taken pity on me.

Of course, the immediate cause of the injury was simple carelessness; I was not staying within the limitations my degraded eyesight had imposed upon me. Still, the underlying cause was my degraded eyesight itself, and it was just a matter of time until it led me into another tight place. I couldn't count upon being so lucky that time. Since my hands were pretty useless for work anyway, I decided to take some time off to attend to my vision.

I knew my optometrist had a kinda new, kinda now plan to address my vision problems; he'd given me an experimental pair to try out along with the regular prescription. While I found that this new method completely restored my depth perception and brought everything back into focus, I didn't want to be making major changes in the way I saw the world just as I was clambering around a 25-foot scaffold, so I put the change off until later.

Clearly, later had come. Then, I couldn't afford to have my depth perception suddenly restored; now, I couldn't afford not to. Long story short, I went to the optometrist, and several weeks later, I was seeing the world with higher fidelity than I had experienced in many years.

And so I returned to my work with great enthusiasm, exhilarated by the return of the third dimension to my life. My enthusiasm was tempered when I saw what I had been doing in its absence:


Ouch. Believe it or not, before I got the new prescription I hadn't noticed the leftmost bead going just a bit wide there. Must. . .resist. . . urge. . .to. . .fix. I'd love to go back and fix the mistakes I made while in my purblind state, but I just can't take the time. It'll give me something to do the next time I paint the house.

* * *

"You want cute? I can do cute."

Sunday, September 18, 2011

A Rather Irksome Realization

As much as I'd like to do a quick job on the east casing, its extremely degraded condition makes that impossible. I was forced to face this grim fact when I got a good look at this:


Notice that my inadvertently over-aggressive initial sanding of this piece has virually obliterated the triple-bead figure, leaving only four shallow, wobbly, mostly paint-choked grooves. Great. Since this would be noticeable from a distance, I have to re-establish some semblance of the original profile; given my skill set, the fastest way to do this is to sand it back into the wood.

The first thing to do is to deepen the grooves while keeping them as narrow as possible at their deepest extent. To do this, I needed something thin and rigid around which to wrap some sandpaper—say, something like a utility blade.


I filed down the edge enough to prevent its immediately cutting the sandpaper at the fold, and then I went to work.


I soon found that I had to use a straightedge to guide me at first, to keep the grooves in their proper place until a straight line was established. Once I started doing that, the method worked well.


In the photo above, you can see that I have re-established the grooves completely about halfway up the visible portion of the piece. You can also see that the middle two are a bit too close together, but since they are at least parallel, this will not be a fatal flaw.

Then, I used a sanding wedge with a concave profile to round off the internal edges and thus re-establish the beads:


I think this will do just fine. Although one can see in this picture that the middle bead is smaller than the others, what the eye sees from a distance is not the beads themselves, but the shadows they cast, and those will check out just fine from the street. In other words, the re-established figure will be fake, but accurate.

This is quite a time-consuming process, and it is extremely taxing of my weakened hands, but if I take my time the job will be done soon enough. Happily, I only have to do it on this one piece; the figure elsewhere is still in good shape.

* * *

"Kenneth, what is the frequency?"

Wednesday, September 7, 2011

Inch by Inch, Step by Step

Well, I haven't got much done since the last post. We had a pretty busy weekend, and since then it's been brain-damagingly hot. But I have gotten some work done.


I got the first pass of widespread patching done: the big divots, the more obvious smaller holes, and the ends of the sill. I'm going to get the top and bottom profiles on the ends of the sill struck accurately so that I can clamp the guides as I did last time and then establish the front plane and the top and bottom edges in one or two passes. You can already see at the top how the apron pieces are looking a lot more solid, but there's still a lot of work to do there. Remember, I still have to attach the patch piece and do extra work to hide the grain up there. First, however, I want to sand and prime beneath it. 

Because of the extensive epoxying I had to do, I have already reached the point where I'm going to have to put down a coat of primer just to get everything the same color so I can see where I need to do further patching. With my weak eyes and all those colors and textures going on, I need as much help as possible to see all the divots.

And by the way, I've vetoed the idea of brushing the wood with diluted epoxy to firm it up. The main reason for this is a basic work precept I've learned from experience: when you come up with a scathingly brilliant idea that you've never heard having been done before, be absolutely convinced that you're really on to something new before you try it. That's because the chances are very great that it's a bad idea. Don't ask me how I know.

Because I hate having only one picture in a post, I thought I'd give you a little background on the difficulties of working on a house that is essentially situated in the middle of a forest, and the specific difficulties of working on this particular casing.


This particular casing is especially difficult to work on because there is a massive pine tree standing less than five feet away, and an air-conditioning compressor sitting right next to it. Because of this, there are parts of the casing I simply can't get to easily, so I have no choice but to lean way off one ladder or the other at times. 

In general, working on this house is difficult because there is a constant barrage of debris falling on every square inch of the property. A case in point: I moved the extension ladder over against the house to get at the top left part of the casing, and as I began to climb it I saw this:


Gobs of the stickiest-imaginable pine sap were splattered all over the ladder. So before I even started to work, I had to go up the ladder with a bottle of paint thinner and a rag, cleaning off all this sap before I started to work. Otherwise, the sap would have gotten all over my clothes, my hands, and ultimately my work. I tell you, there are times on especially hot, messy days that by the time I have prepared everything for working, I'm already tired.

Thank goodness I don't do this for a living!

* * *

"Khaaaaaaaaaaaaaaaannnnnnn!!!"

Saturday, September 3, 2011

Back on Track

Now that I've at last solved the problem of the missing trim, it's time to get back to rehabilitating the east window casing.


With the exception of the cap pieces, the east casing is in worse shape than the west one. It has taken a thorough physical thrashing. This is most likely the work of pine boughs from the adjacent tree, long since trimmed, that did considerable damage in this area of the house. Parts of the casing, notably the vertical pieces, were heavily split, splintered and shredded. The aprons under the cap pieces, as we saw in the last two posts, are cracked extensively; while some of the loose pieces have been nailed in place, several others were hanging precariously.


You can see here, where the cap piece I removed goes, why it was so loose despite the dozen nails driven through it; decades of movement in the wind and weather had enlarged the nail holes into craters.

Overall, the wood is generally soft, seemingly more from oxidation than sun damage; a light exploratory first sanding removed an alarming amount of wood before I could take notice.


This was just from one pass with a quarter-sheet sander using a medium-grit paper; it tore right through the paint and the top layer of wood. Notice how chewed-up the wood in the upper-right portion of the photograph appears, and how flattened the triple-bead pattern is. There's no real evidence of sun damage here; it appears that the last coat of paint was put down over a layer of heavily oxidized wood, which you can see clearly in the darkened area in the lower right corner (where I eased up when I finally took note of what was occurring).

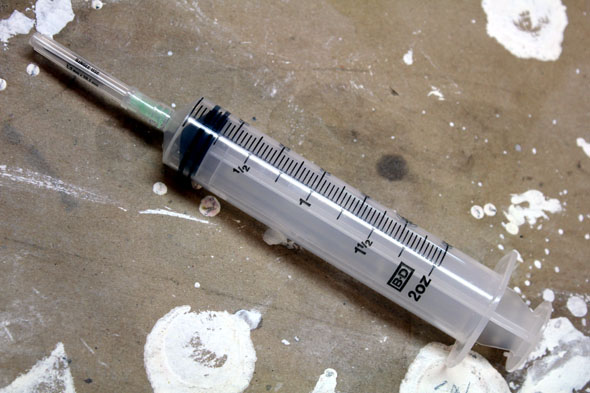
So I stopped sanding for the time being in order to do some preparatory work first.  I applied LiquidWood liberally into the cracks and onto all the areas of severely damaged wood. One area was so thoroughly shredded, however, that I couldn't get enough glue in where I needed with my normal techniques, so I pulled out a new tool that I recently ordered from Abatron: a large (60 cc/2 oz.) syringe.


I've tried medical syringes before with LiquidWood, but the needles were too small to pass the thick liquid. This one, however, worked like a charm, allowing me to inject the epoxy deep into the cracks.


After clamping and curing, the piece was quite solid.

One particularly odd circumstance of this casing is that the right vertical piece is distinctly out of place:


As you can see by comparing it to the sill and the apron below it, the right vertical piece is a half-inch off-line to the right, and the same is true at its other end. As we've learned, when a piece is noticeably off-line like this, there is a story behind it. The house did offer a clue as to this story, but in the pictures I've shown you so far it's already been removed. So let me reach back a bit in the archive to show it to you:


In this detail of a picture taken just before I began work on this casing, you can see an extra board nailed in at the top of the window opening. This window lights the room Anne Wilson occupied for at least the last few decades of her life, and it seems to me that the most likely explanation is that this board was put up to shield her eyes from the direct intrusion of the sun at midday. Apparently whoever installed this board didn't have a saw handy to shorten it a half-inch, so he instead removed the right vertical piece and moved it over to make room. Now, that's a bit too ad hoc, even for me! I'm leaving the board right where it is; it's far too fragile to move.

The one part of the casing that is in relatively good shape is the left cap piece:


It's more or less sound and in its proper place; it's only chewed up where extra nails were driven through it and at the top where it was most vulnerable.  Once I patch it out to its extents, it will look just fine, and match up with the other cap piece neatly.

I'm not quite sure exactly how I will proceed from here; it will all depend upon what I find after a very careful, gentle sanding of all surfaces, If I find that the softness I've found in part of the casing is extensive, I will have to do something to harden the wood before I restore the surface; possibly I may paint it with a coat of LiquidWood diluted with an equal volume of its natural solvent, a proprietary mixture called Abosolv. I'm thinking that this will harden the top layer of the wood sufficiently without interfering with the establishment of a reasonably flat, uniform surface. To use undiluted epoxy all over would add considerably to my work.

* * *


Thursday, September 1, 2011

Woodworking for The Inept, Part Two

The next day, I took my creation out to see how well it fit:


Okay, I could work with this! I knew I'd have to adjust the inside curve, of course, and I knew the piece would be too thick. My only real error in fitting was that I cut wide to the right, although not nearly as wide as it appears here. I made some marks on the piece and took it back in for adjustments.

I enlarged the inner curve with a drum sander on a Dremel, and smoothed the outer curve with a sanding block. I cut what amounted to a small wedge off the right side, and then took the piece out to re-check it. It looked okay, but it was hard to be sure because it was still too thick. So I took it back in and sanded the piece down a bit from the back, being careful to keep the front and back sides parallel.

Sadly, I was so busy keeping the front and back parallel that I allowed them to get just a bit too close. I really should have stopped halfway through and checked my progress against the existing piece, but I was so eager to get it done that I ended up letting myself in for more work. I'd overdone it by less than one-sixteenth of an inch, not much, but enough so that I had to shim it out to the proper level. I didn't have any 1/16" stock handy, but I did have some nice stout paperboard.


This is archival backer board, designed to keep things like pictures and comic books stiff in a plastic bag. It's rigid and fine-grained. Plus, it's just under one-sixteenth of an inch thick. Ad hoc!

Those of you who have been following this blog for a while will no doubt be shocked at my proposing to use a paper product as part of a long-term repair. You may be asking: Is he really under that much pressure to get this done? Has he lost interest in the project? Where's the danged lolcat already?

The truth is, I'm not proposing to use a paper product. I'm proposing to use an epoxy-impregnated paper product. I've learned from experience that when you impregnate a material with liquid epoxy, the material becomes nothing more than a vehicle for the epoxy. It wouldn't be a good idea to put it where it would be exposed on its face, because it would still look like paper, and would be subject to abrasion over time. Laminated to the back of a piece of wood, however, and with only its edge exposed, it would as a practical matter serve as well as an equivalent volume of WoodEpox.

Plus, I had to mix up some LiquidWood anyway. You will recall that last time I mentioned that the plywood I'm using for the new piece is not weatherproof. It's interior plywood, so the glue holding the plies together is not waterproof; the wood is thus subject to delamination over time. To forestall this as long as possible, I was planning to give the piece a good epoxy bath, so it was a simple matter to slip the paperboard in there at the same time, getting the impregnation and lamination done all at once.


After all the hoops I had been jumping through unsuccessfully to get the epoxy to cure thoroughly overnight without needing further heat-curing, this time I just followed the basic procedure, letting it induce for ten minutes, letting the piece soak for about a half hour, then taking it out, wiping off the excess, and letting it sit at room temperature overnight. I figured since there would be very little penetration, and thus very little epoxy mass, the need for further curing would be inevitable.

The next morning, the piece was fully cured, with absolutely no hint of stickiness. Ah, irony.


I couldn't help noticing the effect the epoxy had on the wood: it looked varnished. I filed the observation for future experimentation. Now that the varnish I used on the kitchen cabinets has been outlawed here in California, I'm going to have to find some reliable substitute. The junk that's available now certainly won't do.

Cutting the impregnated paperboard to shape convinced me of its resilience; I couldn't cut it with an X-Acto knife. I had to bear down on it hard with a bare single-edged razor blade to get it to cut cleanly. That indicates that it's harder than birch or poplar.


Once it's painted and part of the casing, the impregnated paper will be indistinguishable.

It was time for one final check for fit:


As the kids say, woo-hoo! The profile and height are now perfect. It still looks wide on the right, but that's due to the perspective. With all that's going on with this piece already, once I've puttied up the gaps, it'll blend right in. . .uh, except for one little detail.

The grain on the new piece is going the wrong danged way! It would have been simple enough to orient the piece so that the grain lined up, but it never occurred to me. Well, as I said, I've never done any real woodworking before, and this proves it. You can be sure that I won't make this mistake next time this kind of thing comes up.

Not that this is a truly harmful error, not with all the other things going on with the casing. Still, I will have to take extra steps to ensure the grain difference is not readily apparent.

I'll do the actual attaching of the new piece a bit later. First, I want to do a little work on the area underneath it. In the meantime, remember: there's no problem that a little epoxy and sandpaper can't fix.

* * *

"Our minds are one: I feel what you feel; I know what you know."